Flutter is a modern mobile app development framework that lets you develop beautiful, highly performant apps in very little time. At Appditto we already have multiple Flutter applications in production — including open source projects like Natrium, Kalium, and Blaise. The biggest pain point of our development process has been the testing, building, and deploying process for all of our apps.
The old way…without CI/CD or Fastlane
If you’ve ever gotten any mobile application into production you can understand the general process, usually it looks like this:
- Run tests…and wait
- Tag the release
- Build the signed android binary (
.aabor.apk) …and wait - Login to the Google Play Developer Console and create a new release
- Upload it to Google Play…and wait
- Fill in your changelog(s) and other general information and publish your app
In the case of a cross-platform app, we can’t forget about iOS
- Start any iOS-specific tests…and wait
- Build the ios app (
flutter build iOS)…and wait - Archive the app in xcode…and wait
- Upload the app to the App Store via xcode…and wait
- And wait for the App Store to process your upload
- Log in to App Store Connect and create a new release
- Fill in any changelog(s) and other information and submit it for review
What’s wrong with all of that, you might ask?
Just to name a few…
- The entire process for just 1 app can take more than an hour, just to get it submitted for review.
- If you introduced a change that caused tests to fail, you don’t know about it until you are ready to release an update.
- If you introduced a change that caused the build to fail, you don’t know about it until you try to build it.
- It’s prone to user error. There’s a lot of steps in the process, it can be easy to miss something.
The Solution: Continuous Integration & Continuous Delivery
We identified the need for continuous integration and continuous delivery (referred to as CI/CD) almost immediately, but there’s a lot of competing solutions out there that we wanted to research and try before choosing the one that best fit our needs.
For our Flutter applications we needed to:
- Automate tests for dart code, Android code, and iOS code
- Automate building the iOS and Android applications
- Automate deployments to the iOS App Store and the Google Play Store
Fastlane is the first part of our continuous integration solution, it is a powerful tool that allows you to automate iOS and Android builds, as well as automate deployments to both of the app stores. It also has several other benefits such as allowing us to manage store information, changelogs, and more in our repository.
In this guide, we’ll walk through the steps required to integrate GitLab CI/CD and Fastlane into your project.
Before we get started…
This article makes a few assumptions you should be aware of.
- Everything described is applicable to Unix environments only — such as MacOS or Linux. If you are using Windows, using the WSL is required.
- MacOS is required to build and sign iOS apps. You can skip the iOS sections if you are only planning to build for Android or don’t have access to a Mac.
- You need to have an Apple Developer Account to publish iOS apps to the App Store
- You need to have a Google Play Developer Account to publish Android apps to the Play Store.
- App Store Privileges — It’s very important for CI that we add a second account to App Store Connect without 2FA-enabled. You can give it the “App Manager” permission and a secure password. If you aren’t sure how to add an additional user, here’s a guide. Anywhere you are asked for credentials for the app store, you will need to use this account.
- Git Usage— It’s assumed that you are using Git for source control. It doesn’t matter if your repository is self-hosted, on GitHub, on Bitbucket, on GitLab, etc.
This guide will assume that you want to automate tests, builds, and deployments to both of the app stores — which means that all of the above is required to completely follow this guide.
Getting started with Fastlane and Flutter
We need to get Fastlane installed and configured for our project. The first step is to install fastlane, it can be installed with gem.
# gem install fastlaneNext navigate to the root of your Flutter project, where you need to initialize fastlane for both android and iOS.
# cd path_to_my_awesome_flutter_appFirst, you might want to add the following lines to .gitignore.
# You definitely want these
**/ios/*.ipa
**/ios/*.app.dSYM.zip

# These are optional
# For our open source projects we choose to exclude some metadata that contains private information
android/fastlane/report.xml
ios/fastlane/report.xml
ios/fastlane/Preview.html
ios/fastlane/metadata/review_information
ios/fastlane/metadata/trade_representative_contact_information
Fastlane install for Android builds and deployments:
You need to obtain a json file that contains an access key from the Google Play Console. More details available in the fastlane docs.
We recommend that you keep this file outside of your repository and in your home directory /home/<YOUR USER>/keys/android/myaccesskey.json or /Users/<YOUR USER>/keys/android/myaccesskey.json (for MacOS). When prompted by fastlane use the path ~/keys/android/myaccesskey.json as the location where you stored your key.
# cd android
# fastlane init
# cd ..
Follow the prompts and make sure all of the information is correct, fastlane will create several files in your project once you are finished.
Fastlane install for iOS builds and deployments:
As mentioned in the pre-requisites, you want a dedicated account without 2FA to use for continuous integration. For iOS, the fastlane installation is similar but you’ll need to use the apple ID and password of your developer account without 2FA.
# cd ios
# fastlane init
# echo 'gem "cocoapods"' >> Gemfile
# cd ..
Follow through the prompts and make sure the detected information is correct. Managing metadata is up to you, it means you can manage changelogs, descriptions, icons, and other data from within your project. In our case, we chose yes for those (with the exception of ios review_information and iOS trade representative contact information — simply delete the metadata you don’t want to manage via fastlane, and add it to .gitignore).
You can check in and push all of the files fastlane has created in your project.
A word on code signing…Android
This article assumes you have setup code signing for your android app as described in the flutter documentation. That means a .jks key store, with a key.properties file excluded from source control that has the password, keyAlias, etc.
If you haven’t configured code signing yet, then follow the steps outlined here before continuing with this guide.
A word on code signing…iOS
For iOS, the story is a bit more complicated.
We’re going to use Fastlane Match, to manage the certificates required for code signing on iOS. Here’s how to do it.
- Create a private git repository named
ios-certificates.gitor similar - Run the following
# cd ios
# fastlane match init
# fastlane match
# cd ..
Follow the prompts to setup match, once completed it will create ios/fastlane/Matchfile, which contains information about the ios-certificates repository.
Configuring Fastlane for Flutter and GitLab (Android)
We installed fastlane with fastlane init, and it configured itself for an Android project. The problem is, fastlane configured itself for an Android project — not for a Flutter project.
The main fastlane configuration can be found in android/fastlane/Fastfile, it has some default lanes. You can think of a lane as a group of tasks. The Fastfile is written in Ruby, so you can write any ruby code within it.
We want two new lanes for android, build_android and deploy_android. The first builds and signs our Android app, the second uploads it to the play store.
We’re going to make some simple shell scripts to build the app and run tests, to keep our Fastfile clean.
# touch android/fastlane/flutter_build.sh
# touch android/fastlane/flutter_test.sh
# chmod a+x android/fastlane/flutter_build.sh
# chmod a+x android/fastlane/flutter_test.sh
These create two empty scripts and make them executable (You can skip flutter_test.sh all together if you are planning to add GitLab as it will become redundant in our pipeline)
Contents of flutter_build.sh:
Contents of flutter_test.sh:
Now we can create our lanes in android/fastlane/Fastfile
Breaking down the first lane, build_android:

sh "./flutter_test.sh": Executes our tests, you may choose to remove this especially when using GitLab CI as we’ll do tests earlier in our pipeline.sh "./flutter_build.sh" --clean: This builds our.aab(Android App Bundle), this is the binary we want to use when uploading to the play store.sh "./flutter_build.sh" --apk: This builds our standard fat.apk, it’s also completely optional but we like to have it in our archive as it’s easier to install if you want to downgrade to a specific version, offer a download in alternative places, etc.
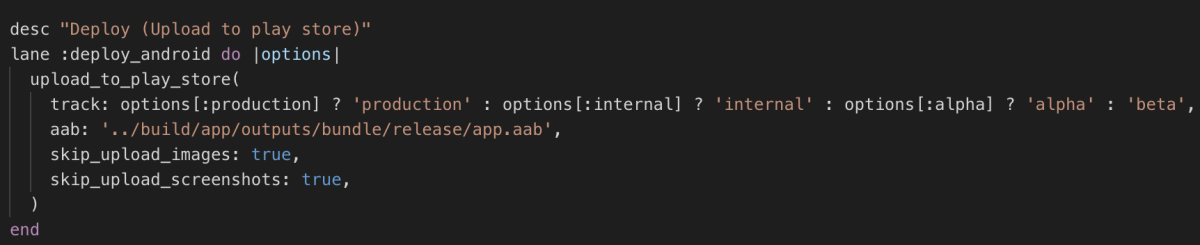
Our second lane, deploy_android, is where things get interesting.
In this lane we are uploading our build to the play store using the fastlane function upload_to_play_store. This single lane allows us to upload to production, beta, alpha, or internal tracks — pretty neat!
You can use these lanes as demonstrated below:
Build the release binaries:
# bundle exec fastlane build_android
Production deploy:
# bundle exec fastlane deploy_android production:true
Beta deploy:
# bundle exec fastlane deploy_android beta:true
Alpha deploy:
# bundle exec fastlane deploy_android alpha:true
Internal track deploy:
# bundle exec fastlane deploy_android internal:true
And we’re done! Fastlane can now build and deploy our Flutter application. We’ll automate this process later, but first we need to configure our iOS build.
Configuring Fastlane for Flutter and GitLab (iOS):
Note: A MacOS machine with the latest XCode installed is needed for this section
Building for iOS and deploying to the App Store is a bit more problematic, mainly because there’s more steps involved. Luckily we can still simplify the process with Fastlane.
We want to start with creating the same two scripts we made for Android
# touch ios/fastlane/flutter_build.sh
# touch ios/fastlane/flutter_test.sh
# chmod a+x ios/fastlane/flutter_build.sh
# chmod a+x ios/fastlane/flutter_test.sh
The contents of flutter_build.sh:
--no-codesign is used in our flutter build step because unlike android, flutter build doesn’t give us a binary that can be uploaded straight to the AppStore. There’ll be an additional build step later which will be where we sign our app.
And flutter_test.sh:
Now we need to create our lanes, like how we did on Android.
Like android, we also want a build_ios that builds and signs our app, as well as a deploy_ios that uploads our app to the app store.
Here’s the whole file, we’ll walk through what it means later:
The Fastfile is Ruby syntax, so when we define variables and functions it’s written in Ruby.
The first group of functions and variables are for creating a temporary keychain which will be used to store our signing and deploy keys.

First we set a couple of variables with the temporary keychain name and password. These are “default” values because we also have the option to include a more secure password from the environment, which we’ll see later.
Then we have a few ruby functions which create and delete our temporary keychain.
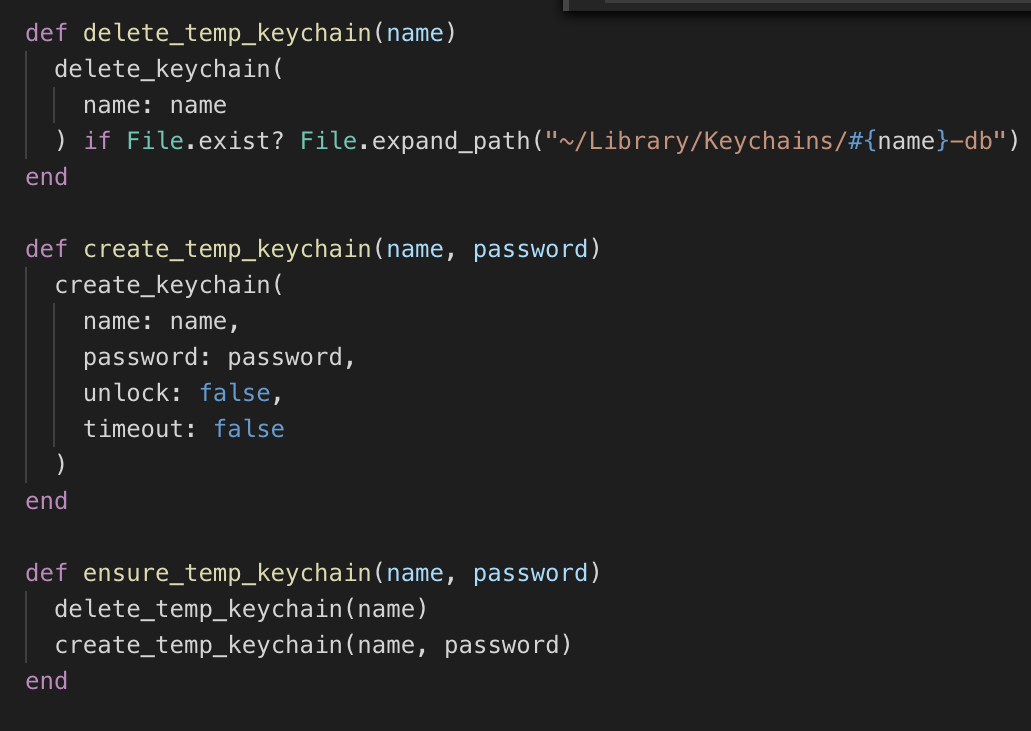
delete_temp_keychainwill delete the temporary keychain if it existscreate_temp_keychainwill create the temporary keychain with a name and passwordensure_temp_keychainsimply deletes any existing keychain of the same name, and creates a new one with the given name and password.
Why use a temporary keychain?
It’s not required to create a new keychain every time you build the app with Fastlane — the default Login keychain, or any other keychain on your system is perfectly fine. There’s a couple reasons we prefer this method over using the login keychain.
- You don’t need to expose your login password. If you use your login keychain with Fastlane, it will prompt you for a password to unlock it when you run
match— not really a problem on a development machine, but for CI/CD we don’t want to be prompted for a password. So we can either provide our login password in the environment or use a different keychain — which is what we’re doing here. - You can provide a strong, random password every time when the process is automated via GitLab — which we’ll see later. This ties into increased security.
Then we have our two lanes, similar to android. One is the build step and one is the upload step.
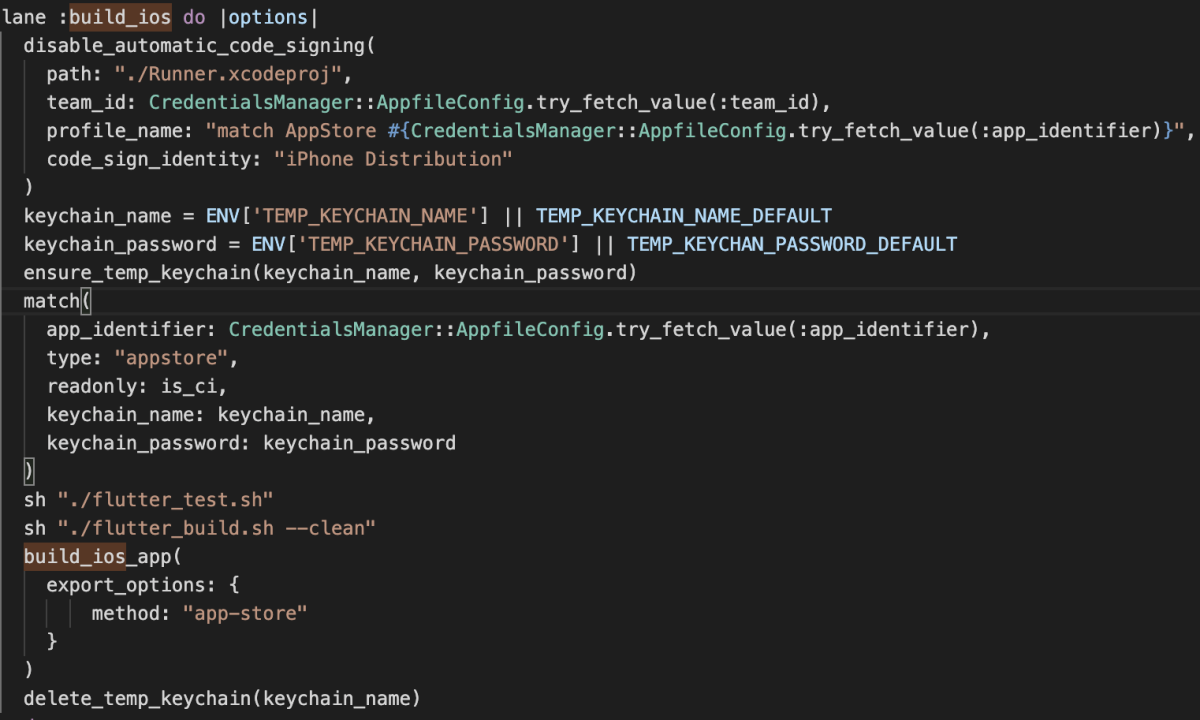
Breaking down the build_ios lane
- It disables “Automatic code signing” which is what we want for our CI/CD server. The
disable_code_signingmethod actually changes your.xcodeprojfile, if you run this locally you probably don’t want to check the modified file into git. You could backup the original at the beginning of the lane if desired, and restore it later by doing something likecp Runner.xcodeproj Runner.xcodeproj.bak. - It creates our temporary keychain with a name and password from the environment, otherwise uses the default one.
- It runs fastlane match, to install the certificates and profiles into the temporary keychain
- It runs the flutter tests and build
- It builds the
.ipafile and signs it, which is what we need to upload to the App Store - It deletes our temporary keychain at the end

And the deploy_ios lane is where things get really cool
- It can upload to test flight
- It can upload to the App Store and submit it for review automatically! It will upload, make sure everything is valid, wait for processing, then submit it for review all in one step.
Like android you can do either or with parameters
# cd ios
To upload to testflight:
# bundle exec fastlane deploy_ios testflight:true
To submit for review:
# bundle exec fastlane deploy_ios
One more thing
For iOS apps, if we want to automatically submit them for review we need to set the answers for our compliance questions. You can add the following to ios/fastlane/Deliverfile, but change the answers as they apply to your app.
And we’re done with Fastlane!
You can now build and deploy your iOS and Android apps in a couple simple steps.
Automating all of it with GitLab CI/CD
Now that we can build and deploy our apps with a few simple commands, it’s time to automate it. This is where continuous integration comes in.
Why GitLab?
There’s plenty of continuous integration/continuous delivery (CI/CD) solutions out there including Travis CI, GitHub Actions, Codemagic, Bitbucket pipelines, Circle CI, Jenkins, etc. I encourage you to research all of them and determine which one fits your needs the best. For us, we determined that GitLab’s CI/CD would work best for us. That definitely won’t be the case for every team or every project, but here’s the reasons we chose it over the others:
- Ability to use your own runner. Think of a runner like a “worker” — it executes your pipelines and in our case will be responsible for running tests, building the apps, and uploading the apps. Many of the services mentioned only allow you to use their shared servers with limited usage caps. Many offer enterprise solutions, paid plans, and various other things to fit your needs — so again, definitely research them and find what works best for you.
- MacOS Requirement. Flutter applications need MacOS to build the iOS binary and upload to the App Store. If you don’t intend to server iOS users, then this doesn’t apply to you. Most of the services above provide MacOS servers that you can use (GitLab happens to not provide these), but they’re generally more expensive and more restrictive. Also, we’re dealing with very sensitive data — signing and deploy keys, app store manager passwords, google play upload keys, etc. Unless you’re using an enterprise solution offered by one of the above mentioned CIs, this may not be something your internal audit requirements allow for.
- Intuitive Configuration. The yaml configuration that GitLab uses is very straightforward, easy to understand, and easy to work with. You can build very complex pipelines in very little time.
- Intuitive Interface. The experience using GitLab is generally good. It has an interface where you can easily visualize and manage your pipelines, alerts, auto-cancel features, archiving, and a lot more that really fits our needs.
If your project isn’t already in GitLab, you can create a new one, import one, or mirror it from another repository. We chose to mirror it because our projects are hosted on GitHub, but your needs may vary. More information can be found on the GitLab website about creating, importing, or mirroring a project.
What about the server?
As I said above, GitLab does not provide any shared MacOS runners — which we need to build and deploy our iOS apps. Luckily the gitlab-runner software is incredibly easy to setup, you can run it on any MacOS machine including a MacBook.
We chose to setup a bare-metal dedicated MacOS server, this has some downsides — primarily that we need to manage the infrastructure ourselves, keep flutter up to date ourselves, keep XCode and the Android SDK up to date ourselves, etc. However we need MacOS, which is why we chose the bare-metal option instead of using docker containers or a similar lower-maintenance solution. If you want to follow the same approach — a Mac Mini makes a great option and used, older ones are relatively inexpensive. You can also use a hosting provider such as MacStadium or MacInCloud. Or like I said, if you already have a MacOS development box you can simply setup the gitlab-runner on that.
Server Configuration
Note: If you are intending to use the gitlab-runner on a MacOS development machine that has already been configured for flutter development and FastLane, you can skip these steps. If you are intending to build for android-only, you can skip installing XCode.
If you’re using a bare-metal MacOS server you need to install the required software to build iOS and Android apps.
- Install the Android SDK — Android Studio is the easiest way to install it.
- Install XCode — via the MacOS App Store
- Install Flutter — Make sure you also add it to your PATH, as described in the document.
Once these are complete, run flutter doctor -v to ensure everything is configured correctly.
One other thing we’ll want to do, is install XCode command line tools. This can be done by running the following command:
# xcode-select --installWe need to add some environment variables, we can add them to ~/.zprofile (on MacOS Catalina) or ~/.profile (other MacOS versions)
export LC_ALL=en_US.UTF-8
export LANG=en_US.UTF-8
# Ruby
export GEM_HOME=~/.gems
export PATH=$PATH:~/.gems/bin
You can also choose to store sensitive variables here, such as FASTLANE_PASSWORD (the password of the AppStore/Developer account you used to setup fastlane with) and MATCH_PASSWORD (the password required to decrypt your iOS certificates.
export MATCH_PASSWORD=abc123
export FASTLANE_PASSWORD=123abc
You can also choose to store variables in the GitLab interface per-project, which is what we’ll do for the rest of the guide. Just know that you have the option to do it this way.
Getting access to ios-certificates
For fastlane match, you should have created a private git repository with all of your encrypted signing/deploy certificates. We need to give this machine access to these.
# ssh-keygen -t rsaOnce complete, you can add read-only access to your repository using your public key (by default located in ~/.ssh/id_rsa.pub). GitHub calls them Deploy Keys.
Installing keys for Android/Google Play
We need to install our jks key store and .json file that we generated earlier. Upload it to your server and copy it to your home directory. For our example we’ll have them at /Users/<YOUR USER>/keys/android/appditto.jks and /Users/<YOUR USER>/keys/android/myaccesskey.json
# mkdir -p /Users/<YOUR USER>/keys/android
# mv myaccesskey.json ~/keys/android
# mv appditto.jks ~/keys/android
Installing the GitLab Runner
We need to install the gitlab-runner software, it’s very easy to do.
In GitLab, navigate to your project settings -> CI/CD -> Runners and find your registration token. It should look like this
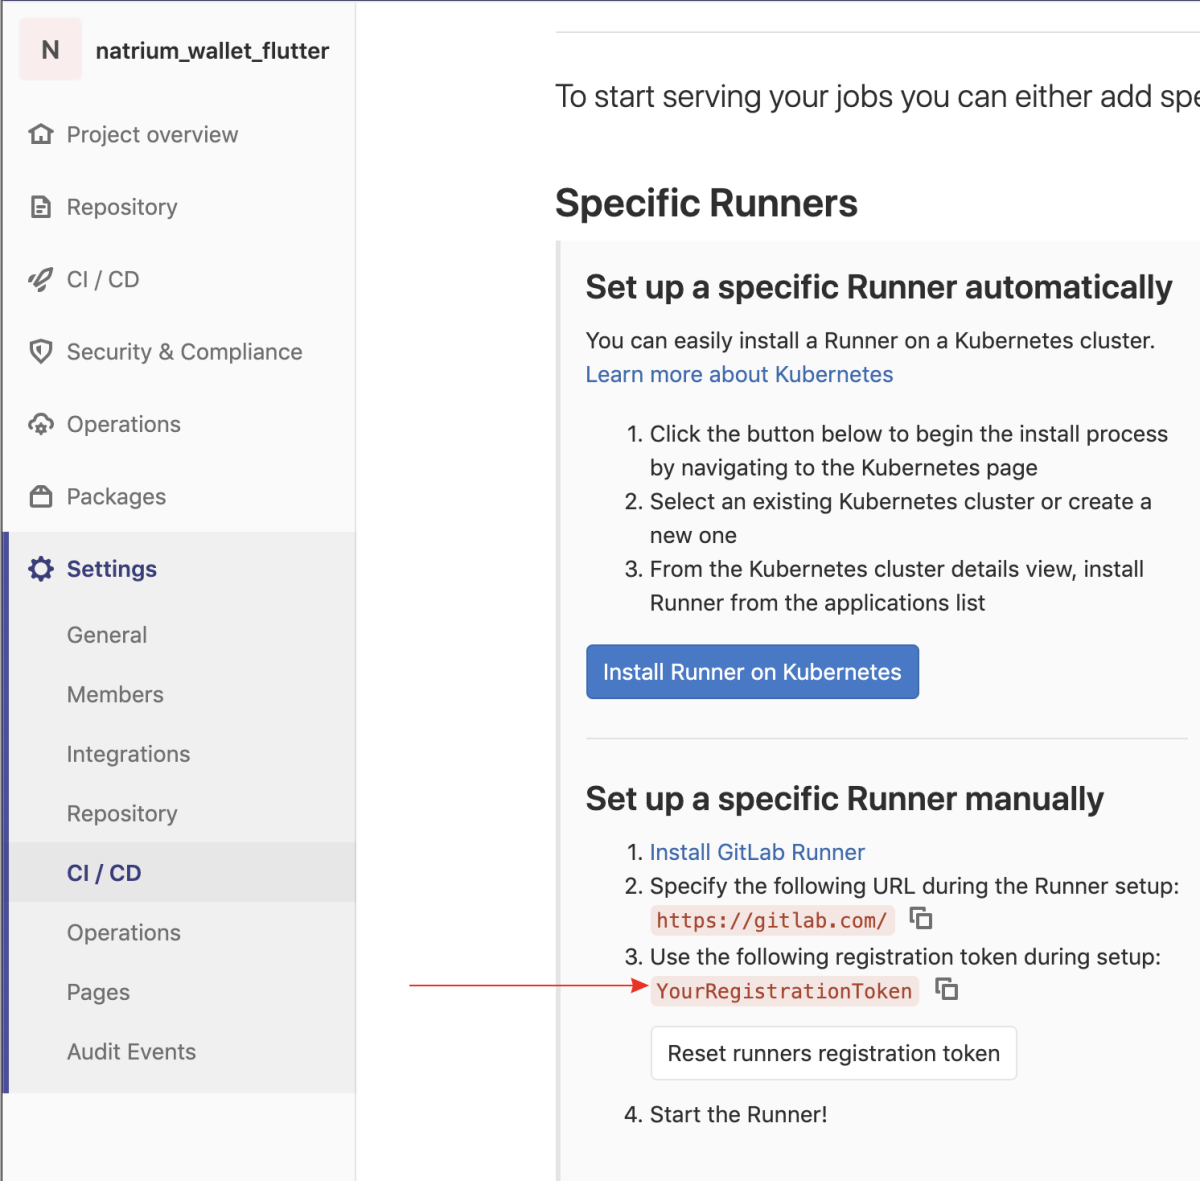
It just so happens that ours is YourRegistrationToken, we’ll need it when we setup the gitlab-runner.
To install the runner:
# sudo curl --output /usr/local/bin/gitlab-runner https://gitlab-runner-downloads.s3.amazonaws.com/latest/binaries/gitlab-runner-darwin-amd64
# sudo chmod +x /usr/local/bin/gitlab-runner
Now that it’s installed, we can register it for our project using gitlab-runner register.
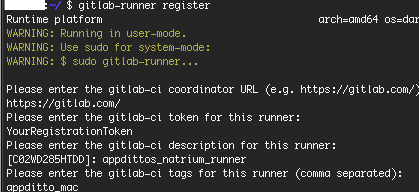
- Choose
https://gitlab.com/when prompted for gitlab-ci coordinator URL - Enter your token from above, ours is
YourRegistrationToken - Choose whatever description you want
- Choose whatever tag you want, but remember what you chose
appditto_macin our case, will be used to target this specific runner when we create our pipeline. - For runner type, choose
shell
Then all we do is install and start the runner, and it should run as a Launchd service that will start itself upon system reboots, etc.
# gitlab-runner install
# gitlab-runner start
You can refresh the gitlab settings page and you should see your runner appear.
Creating our Pipeline
We saw how easy it was to install the gitlab-runner software and configure out server. Now we need to get into the fun stuff — creating our pipeline!
A pipeline is basically just a set of jobs that may execute in a specific order. For example test -> build -> deploy. The pipeline is triggered on every commit (by default).
We’re going to design a relatively simple pipeline that can test, build, and deploy our app.
We’re going to create a file called .gitlab-ci.yml in the root of our project (awesome_appditto_app/.gitlab-ci.yml)
First part will be the stages, this defines all of the stages in our pipeline.
test— will be where we run our testsupdate— This is simply going to update our flutter dependencies, we want to runflutter packages upgradeevery time because by default GitLab will “cache” the repository instead of cloning it every time (for speed), which means we aren’t guaranteed to have the latest versions of everything unless we do this.build— This stage will build our android and iOS app.deploy— This stage will deploy our android and iOS app.
Every stage depends on the previous one. So if test fails then none of the other jobs will run, and the entire pipeline will be considered as failed.
—
First we can define a job in the test stage
The job is named tests, it only runs when commits are pushed to the master branch, it is part of the test stage, it only will run on a runner with the appditto_mac tag, it executes one command flutter testand it is interruptible which means it can be cancelled automatically. If there are two pushes on the master branch, GitLab will cancel redundant pipeline runs automatically for us.
—
Then define a job in the update stage
Very similar to the test job, except we’re running two commands instead of only 1: flutter packages get and flutter packages upgrade.
—
Then we can define our build stage. This one consists of two jobs and gets a bit more interesting.
We have two jobs android:build and ios:build.
They are both just a series of shell commands like the previous jobs, although a bit more complicated. The android:build job is creating a key.properties and local.properties file on the fly, which is used by our android build to determine the SDK location as well as access the key store so it knows what to use for signing our app. We’ll get to defining our environment variables later, if you’re wondering what $ANDROID_KEY_STORE_PASSWORD and the others mean and how to define them.
ios:build is creating some environment variables, TEMP_KEYCHAIN_NAME and TEMP_KEYCHAIN_PASSWORD. Remember how earlier we configured fastlane to create a temporary keychain for signing the app? This is just generating a random name and password for that key store on the fly.
Another new thing in this job is artifacts. We want to specify our build artifacts so GitLab can archive them for us. This includes our signed .apk, .aab, and .ipa files. After every successful build stage GitLab will archive the build artifacts so we can come back and download them later, if desired.
—
We can then create some jobs for the deploy stage. We’ll create 4 total. One for production on Play Store (Android), one for App Store (iOS), one for Play Store internal track (Android), one for TestFlight (iOS)
There’s 4 jobs that are part of the deploy stage, you can see that they simply execute some of the fastlane lanes that we created earlier with various options.
The main difference with these is when: manual. We don’t want these deploy jobs to be triggered automatically, because we don’t want to push builds to the AppStore/Play Store every time a new commit is pushed. So with this option, these jobs can be triggered manually after the build stage is complete.
Here’s the entire gitlab-ci.yml that we put together, for reference.
You can do a lot more things with your pipeline. For example, with our open source app we also want to automate release tagging and upload APKs to GitHub, you can see that here for reference.
Check the file in and push it to your repository. You should the job trigger immediately.
Setting up environment variables
Your android build probably failed if you’ve been following this guide. We had specified some environment variables in our .gitlab-ci.yml but didn’t define them anywhere.
We need to define the following:
FLUTTER_PATH— This is the location you installed flutter on the server (example:/Users/<YOUR USER>/flutter)ANDROID_SDK_PATH— This is the location the android SDK was installed on the server (example:/Users/<YOUR USER>/Library/Android/sdk)ANDROID_KEY_STORE_PASSWORD— This is thestorePasswordvalue in our key.properties, AKA the password used to unlock your key store.ANDROID_KEY_ALIAS— This is the name of the key used to sign your app,keyAliasin the key.properties file.ANDROID_KEY_PASSWORD— This is the password for the key,keyPasswordin the key.properties file.ANDROID_KEYSTORE_PATH— This is the location of the.jksfile. (example:/Users/<YOUR USER>/android/keys/appditto.jks)
There’s two options for defining these variables that we’re going to cover.
- Placing them in
~/.zprofile(Catalina and newer) or~/.profile(Mojave and older). - Setting them up in the GitLab interface.
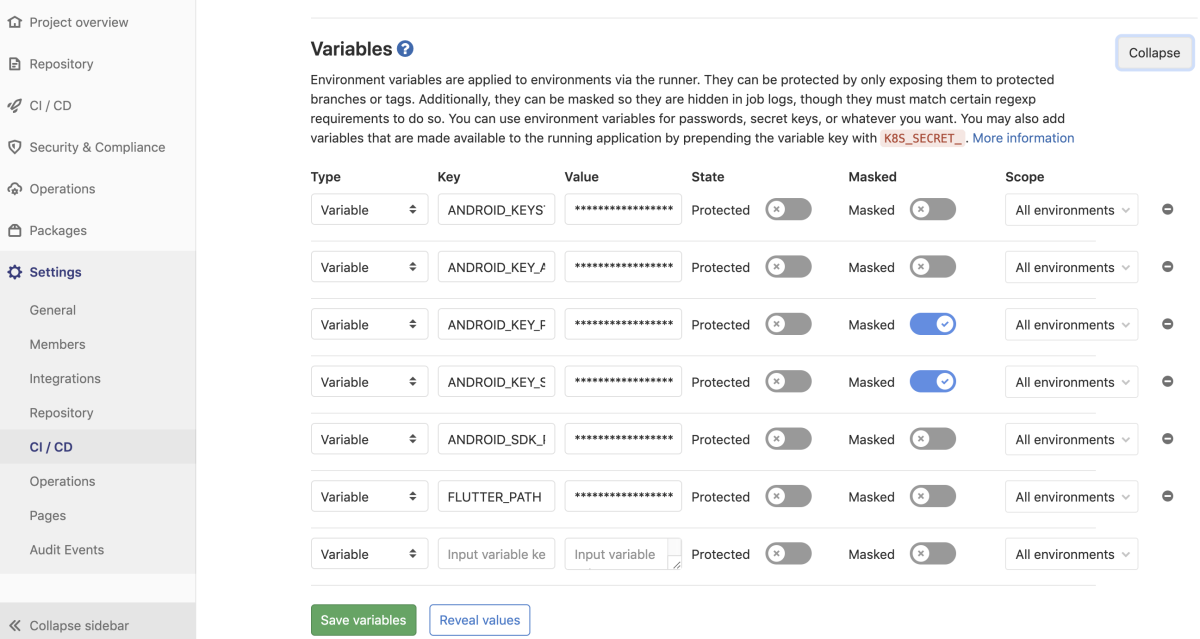
We already briefly covered #1, we’re going to choose #2 this time. There’s pros and cons to each approach but ultimately it’ll be up to you to decide.
Adding them in GitLab is very simple, just navigate to your project settings as seen below and add them:
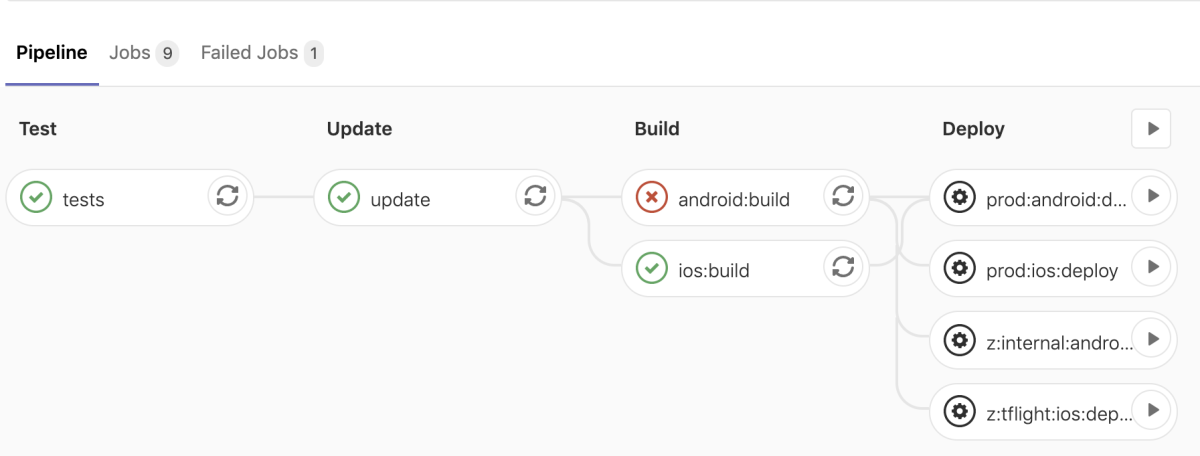
And we can re-run our pipeline and can see that it passed!
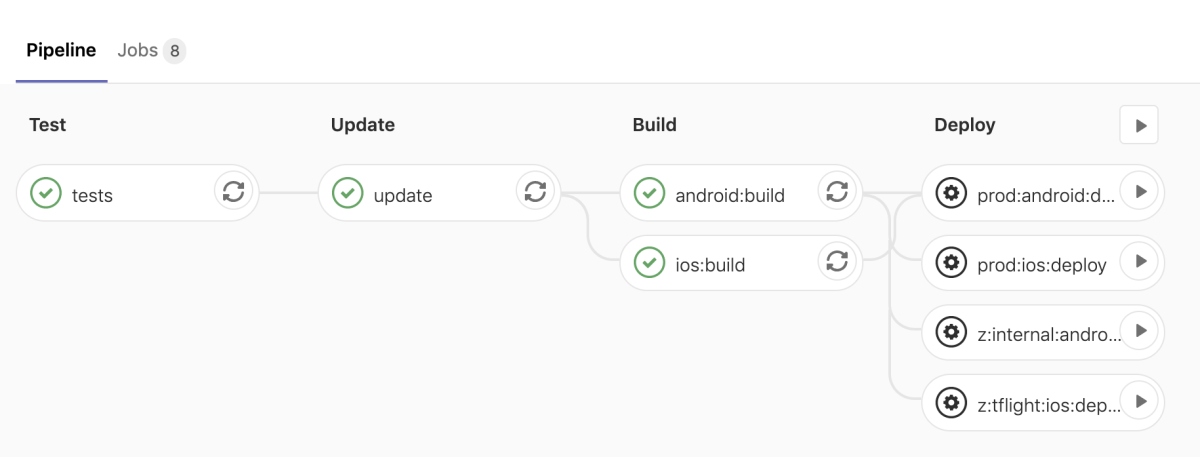
We can see that our deploy jobs did not get triggered, which is what we wanted. When we want to deploy it to the app store we can just login to GitLab and manually run whichever deployment we want.
Let’s Recap
We’ve successfully automated our workflow using GitLab CI/CD and Fastlane.
- On every commit to
master, all of our tests and both builds will run - On successful builds, GitLab will archive the binaries so they are available for us to download later if needed.
- Also on successful builds, our binaries will be available for us to deploy at our leisure with the press of a button.
- If our tests or builds are failing, GitLab will alert us of the failure based on our preferences (email is the default)
Now our code is continuously tested, built, and the latest builds are ready to deploy!
Thanks for reading!

Appditto Website: appditto.com
Appditto Twitter: @appditto
Appditto Github: @appditto
Appditto Instagram: @appditto


